Hula Hoop Throwing

Easy
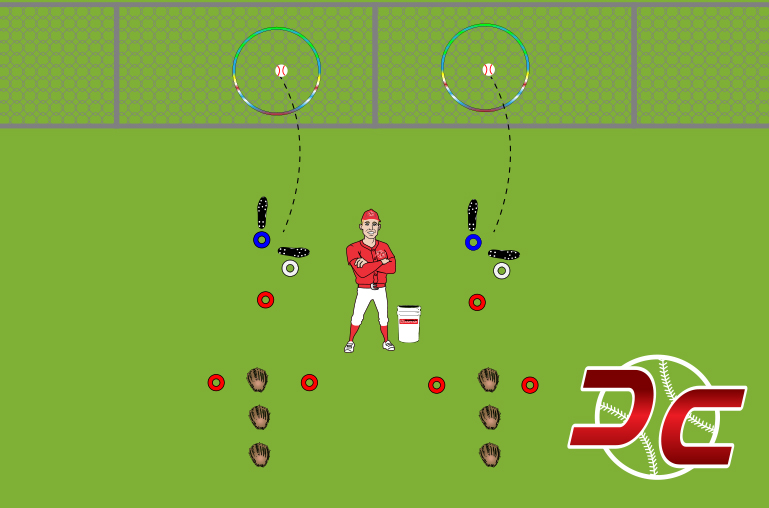
Hula Hoop Throwing is a drill designed to work on basic throwing mechanics. Highlights include stepping with the opposite foot and utilizing a proper four-seam grip. Hula hoops are tied to the backstop to provide a fun target for athletes to aim at.
EXECUTION – There are three possible steps to this drill, starting from easiest and moving to most difficult. Use cones to set up a starting gate, and three markers for the feet (see diagram). A bucket of baseballs should be placed next to the starting gate cones. Finally, affix two hula hoops to the fence to serve as targets.
Discussion – Begin the drill with discussion, before moving into live throwing. With athletes standing side-by-side, give each a baseball and teach the four-seam grip. Use keywords “Happy Horseshoe” to describe the finger placement of the four-seam. Once all have shown a proper grip, move into throwing mechanics and explain the drill. Be sure to explain the concept of the “Ankle Eye” here as well.
Action – This drill has three steps:
- Feet Planted – With a staggered stance, the athlete will have the non-throwing foot forward. The feet will not move, except for the natural follow through of the back foot AFTER the throw has been released. Step forward with a baseball, show the four-seam grip, and then place the feet into the furthest two cones. Without lifting the feet, rock back and fire towards the hula hoop target. Allow the trail leg to release and follow through.
- Ankle Eye Step – For this variation, the right foot is planted in front of the body, with the ankle open to “see” the target. The hands are together, in front of the chest. On the coach’s verbal, the athlete is to step with the left foot and unleash an aggressive throw towards the target.
- Left-Right-Left – For the most difficult phase of this drill, athletes begin with the feet parallel. Short step forward with the left foot, right foot “ankle-eye” step, left foot step and throw.
DC KEYS
- Ankle Eye – Teach the throwing side foot to plant with the inside of the ankle pointing to target. This will help the shoulders to naturally turn into the throwing position and will be useful during infield drills. Use the keyword “Ankle Eye” and describe the knob of your ankle as an eye ball. This Ankle Eye needs to see the target in order to deliver an accurate throw.
- Repeat the Drill – This is a drill that can be run a number of times. Add variations and difficulty with expanded footwork. Feel free to run it at three, four practices in a row.
- Color Coded Cones – Use different color cones to mark each foot’s placement. This helps with verbal commands from coach to player.

EXECUTION KEYS
- FEET PLANTED
- ANKLE EYE STEP
- LEFT-RIGHT-LEFT
DC KEYS
- USE "ANKLE EYE" TO ALIGN THE BODY
- REPEAT DRILL OVER TIME
- COLOR-CODED CONES
EQUIPMENT LIST
 Baseball Buckets2
 Cones10