Slow Rollers

Hard
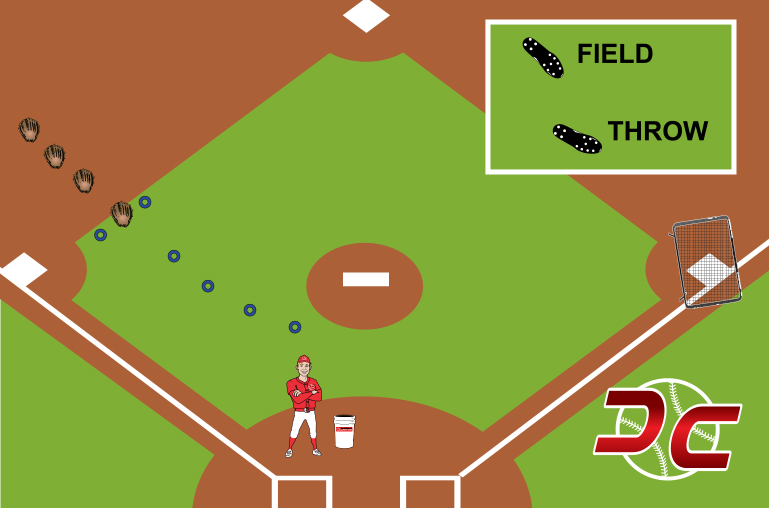
Slow Rollers is an important infield drill to teach athletes (1) to throw on the run and (2) to make the difficult slow roller play. Instruction begins with a walk-through overview of throwing on the run. By the time ground balls are introduced, all athletes should be comfortable throwing on the run and instruction can progress to the slow roller.
EXECUTION – Use the third base area for instruction and set up a gently curving cone-line to guide the athlete’s path. As with many DC drills, use one cone for the athlete line and two cones for the “starting gate.” Place a catch-net at an appropriate angle at first base. You will spend the majority of your time sitting on a bucket in between home plate and the pitching mound.
PART I / DISCUSSION (3 mins) – Begin the drill at the starting gate cones, with all athletes together for a discussion. Provide a drill overview and a quick description of two main keypoints:
- Slow Roller Execution – Field the ground ball on the outside of the glove side foot. Take a couple steps. Throw off of the throwing arm foot. Field – step – step – throw! This is similar to how a ground ball is fielded in the outfield (see How to Coach: The Crow Hop).
- Throwing on the Run – Plant the throwing-side foot and throw. This is against all that you’ve been taught thus far – fundamentally INCORRECT! So have fun with it.
Finish by giving each athlete a baseball for walk throughs.
PART II / WALK THROUGH REPS (7 Mins) – Starting with a baseball in the hand and at a walking pace, athletes are to practice throwing on the run. This is done with an arm fake at each cone, before unleashing a throw to a catch net upon reaching the final cone. As appropriate, speed up the pace from a walk, to a jog, to a full sprint. When all have show the ability to throw on the run, add a ground ball.
PART III / SLOW ROLLERS (2 Mins)– Starting once again with a calm pace, add slow roller ground balls. Time to coach-up the play by fielding the baseball outside of the glove side foot, and then throwing off of the arm-side foot. Start with a slow pace and extra steps in between the field and the throw.
DC KEYS
- Add Multiple Steps – When moving to slow roller ground balls, encourage the athletes to involve extra steps between the FIELD and the THROW. This extra time can be especially helpful for the less-athletic players, while their brains grind to figure out this throwing on the run thing.
- Flamingo – If an athlete really struggles to get “throwing on the run,” have them stand on their arm-side leg (only) and throw to the catch net. They’ve been taught so well to stop and set their feet, that it is at times necessary to involve the flamingo. Arm fake –> arm fake –> arm fake –> flamingo throw.
- Around the Bucket – After each throw, athletes are to run around the bucket (and you seated on it). This aids in maintaining direction, and also safety.
- Overthrow Helper – It really helps to have a parent or brother/sister to help with errant throws on this drill. Often times, the angle of an overthrow by a charging infielder is one where baseballs can roll past the end of a fence line.
CLOSING – Coach the WHY. Teach your athletes WHY we are throwing on the run. This is only done only when we believe the runner will be safe if we take the time to stop, set the feet, and then throw. Use results to reinforce the point: Take a look at how many throws have actually made it into the net! It will be a small number relative to the amount of throws. Were it an accuracy competition, we would never throw without setting our feet!

EXECUTION KEYS
- DISCUSSION
- WALKING REPS
- SLOW ROLLER REPS
- GREAT PLAYS
- COACH THE WHY
DC KEYS
- ADD MULTIPLE STEPS
- FLAMINGO THROW
- AROUND THE BUCKET
- OVERTHROW HELPER
EQUIPMENT LIST
 Baseball Buckets1
 Cones6
 Catch Net1