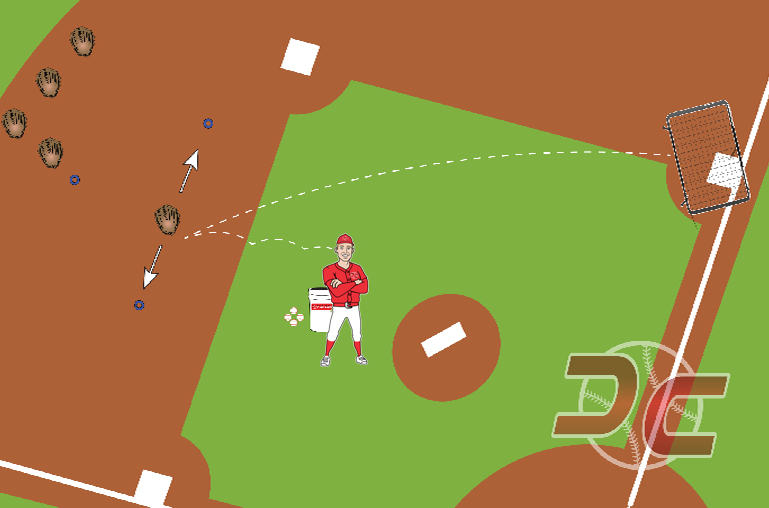
How to Coach: Ground Balls #1

Medium
This is the first step in teaching Ground Balls to your athletes. Conceptually, the goal of How To Coach: Ground Balls #1 is to begin training ground ball instruction after installing a general understanding of what actually happens during a ground ball. From this point forward, the How-to-Coach: Ground Ball Series (as well as any other infield drills for that matter) will use, and build upon, the understanding gained during Fundamentals: Ground Balls. For a complete overview of what actually happens when an athlete fields a ground ball, see Fundamentals: Ground Balls in the DC Library.
How to Coach: Ground Balls #1 involves layered repetitions with the athletes STARTING in a fielding triangle position. The purpose is to give the athletes the opportunity to successfully execute the fielding triangle and exit footwork (footwork out of that fielding triangle position). For this reason, athletes will start with a ball in their glove – and work up to live ground balls. If you try to get execution while standing 80 feet away and hitting ground balls, beginners are going to struggle. Before that, however, Dugout Captain recommends starting this drill with a group discussion breaking down the four steps to a ground ball.
PART I – GROUP DISCUSSION / WALK THROUGH
Begin the drill at individual cones. With each athlete spaced out and standing behind a cone, quickly review the four movements of a ground ball: 1) Ready Position; 2) Approach; 3) Fielding Triangle; 4) Exit Footwork. Place special emphasis on describing and explaining the fielding triangle position, as the bulk of the repetitions will be made from this position.
Next, dive deeper into the steps taken AFTER the ball is in the glove. This is called Exit Footwork and involves the following actions:
- Right Foot Step – Called the “Ankle-Eye” step, this involves stepping forward while turning the inside of the ankle towards the target.
- Left Foot Step – Called the “Power-Step”, this lines the shoulders up and closes off the body towards the target.
- Shuffle – Force a shuffle towards the target. Builds momentum, increases power, corrects direction.
- Throw – Unleash a BB across the diamond!
After several repetitions without a baseball, move forward to the Cone Triangle for live repetitions.
PART II – GROUND BALL REPS @ CONE TRIANGLE
Continue the drill by moving the group forward to the Cone Triangle (two cones five yards apart, with one more cone two yards back) and getting to work! Repetitions here involve a baseball and throws. Instruction should start slow and gradually increase in both pace and difficulty.
Ball in Glove – Broken Movements from Fielding Triangle
Start with athlete in the fielding triangle position, and feet locked in concrete. Work through the line two to three times with a ball already in the athlete’s glove, and use broken movements. Involve pauses and freezes at each position. The goal is for all athletes to experience correctly executing the “Exit Footwork”
Slow Rollers – First Broken, Then No Stopping
Next, use a slow roller pace involving freezes, or broken movements, OUT OF the Fielding Triangle. Use freezes at each step (right foot step / left foot step / shuffle / throw). As execution improves, work into no-stopping with a slow pace, and then faster movements. When appropriate, the right-foot-step and left-foot-step become a POP! to the throwing position. This is a major key to development and applies to the entire field!
DC KEYS
- POP! Footwork – Exit Footwork (right-foot step “ankle eye”, followed by left-foot step “power step”) becomes a POP! The Pop is the athletic movement from fielding triangle to throwing position.
- Instruction vs. Repetition – Are you trying to teach, or are you trying to get a bunch of ground balls? The goal here is building a fundamental understanding of the ground ball movements. But you must get enough action going to maintain athlete focus. There are times to teach (ball in hand, slow rollers) and there are times to stand back, keep your mouth mostly shut, and get the athletes ground balls.
- Compete for fun! Towards the end of the drill, involve throws to the catch net and a point competition.
- Slow Down – Teach with pace. Provide each athlete the chance to execute correctly… numerous times

EXECUTION KEYS
- GROUP DISCUSSION - TEACH THE ABSOLUTES
- INDY REPS @ THE CONE TRIANGLE
DC KEYS
- POP - FIELDING TRIANGLE TO THROWING POSITION
- INSTRUCTION VS. REPS - HAVE A PLAN
- COMPETE - GET TO POINTS COMP
- SLOW FIRST - COACHING PACE MUST SET TONE
EQUIPMENT LIST
 Baseball Buckets2
 Cones25